Our Deluxe Snow Cab fits most 2-stage Cub Cadet snow blowers. These instructions will explain how to install the Deluxe Snow Cab onto your Cub Cadet snow blower.
INSTRUCTIONS
Step 1 - Prepare your snow blower for maintenance.
Place your snow blower on a flat surface. Turn the engine off and let it cool. Remove the safety ignition key to prevent accidental starting of the engine.
Step 2 – Check the components of the deluxe snow cab.
Remove all bars, poles and hardware from your snow blower cab box. Be sure you have all parts and tools required. Refer to the manual for detailed instructions.
Step 3 - Assemble the A and B bars.
Slide one set of bars, A and B, together. Install a set screw finger tight. Repeat for the opposite side. Do not tighten screws with a wrench until the frame of the cab has been completely assembled.
Step 4 - Connect the A and B assemblies with bar E.
Take Bar E and insert it into the ends of assemblies A and B, with the nut facing the inside of the frame. Secure with a set screw, finger tight.
Step 5 - Connect bar E and F.
Take poles F and insert them into each end of bar E so that the narrow end is facing up.
Step 6 - Connect poles G with the A and B assemblies.
Insert poles G into the ends of the A and B assemblies with the narrow end facing up. Secure with setscrews, finger tight.
Step 7 - Connect the D and C rods.
Locate the curved rods C and D and lay them on a flat surface. Connect a D rod to each side of the C rod and secure them with setscrews. Be sure to match up the arrow points to each other. Tighten the setscrews with the wrench that came in the cab kit.
Step 8 - Install the curved rod assembly.
Install the curved rod assembly into the top of the G poles, installed earlier.
Step 9 – Feed the H rods through the sleeves.
For the next few steps, be sure to wear safety glasses. Locate all the flexible rods. You should have four H rods and one I rod. Open the fabric cab cover to locate the inside sleeves. Feed both H rods through the sleeves. Then, insert the steel ends of the H rods into the top of the F poles.
Step 10 - Connect the H rods with the I rod.
Insert the remaining H rods over the existing H rods. Take rod I and insert one end into one of the ends of an H rod. Carefully bend the red over and attach it to the end of the remaining H rod.
Step 11 - Begin to attach the cab cover.
Pull the cab cover up and over the rod assembly and slide the rods into the inside pocket of the cover.
Step 12 - Tighten all the setscrews.
Visually square up the cab assembly. Use the wrench to tighten all setscrews.
Step 13 - Finish attaching the cab cover.
Take the top of the cover and pull down and back towards the C and D assembly. Loop the elastic straps around the bottom corners of bar A to secure the cover to the frame.
Step 14 - Loosely assemble the clamps.
Depending on your unit, the clamp L may be horizontal or vertical. Clamp K will always be horizontal. You can loosely assemble clamps M, L and K with the provided nuts, bolts and washers, but do not tighten them at this time. You will need to slip the clamps on the frame at a later step.
Step 15 - Determine the best location for your cab.
Using an assistant, have them hold the cab frame and cover over your snow blower to find the best location for your cab to be secured to your unit. Hold the cross bar, J, to determine the best placement for the frame.
Step 16 – Mount the clamps.
Mount the pre-assembled clamps, M, L and K to the upper handlebars on the snow blower using the provided nuts, bolts and washers.
Step 17 – Attach the crossbar to the clamps.
Center the J crossbar against the two clamps. Secure with the end clamps using nuts, bolts and washers. Make sure the J bar uprights are level. Your clamps may need to be mounted to the horizontal handlebar, depending on your unit. Then tighten the L and K setscrews.
Step 18 – Insert the cab assembly.
Fully insert the front ends of the cab assembly into the ends of the crossbar. Then, secure the upper cab to the J bar upright with two setscrews. Tighten the setscrews to secure. With an assistant holding the cab horizontally to the ground, tighten all bolts and setscrews.
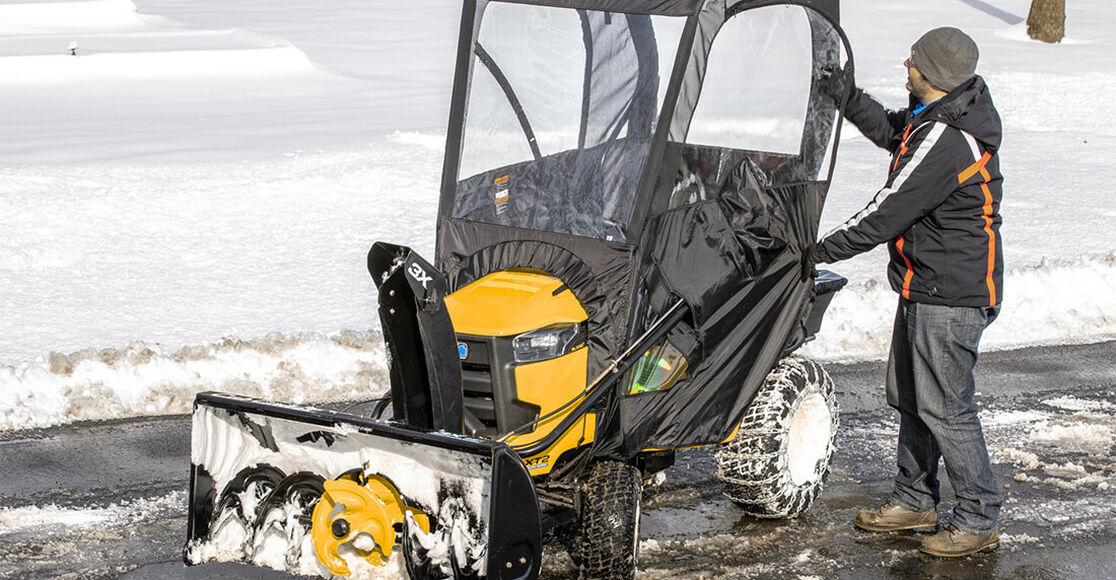
Step 19 - Fasten the cover to the cab and attach the pouch.
Step 20 - Open the zippers to allow headlight to shine through (if applicable).
The cab is designed to accommodate snow blowers equipped with a headlight. Zippers on the front end of the cab can be opened and the flaps pulled back and secured with hook and loop straps to allow the light to shine through.
Step 21 – Make final adjustments.
At this time, adjustments may be necessary for free movement of operational controls.